One of the most important aspects of any MMORPG is customizing the HUD to access important information with little to no effort, and Final Fantasy 14 is no different. Everything from QoL changes, size adjustment, and where to position certain things are essential to every player but ultimately fall to the eye of the beholder.
While it is 100% up to personal preference, and no one HUD is for everyone, there are a few things you may want to consider doing once you get into high-level play. There will be many instances where you need to know what attack the enemy is about to unleash, what buffs or ailments you currently have, and a vast number of other things that can mean life or death for you and your team in a raid or other late-game content.
The Basics

The primary focus you should have when creating a good HUD is to have important information readily available to you at a glance, rather than having to focus your attention all over your screen. With that said, none of this matters if the layout isn't comfortable for you. We all have different preferences, so feel free to adjust anything that feels off to you if need be!
However, suppose you will be taking on the more complex late-game activities such as raids, extreme trials, and savage raids. In that case, you should try to have some of the more crucial information towards the middle of the screen if possible—things like Target Info, Status Info, Job Gauge, and Focus Target Bar. Having that information readily available at a glance can save you and your team's life and prevent you from wiping in hectic moments.
Additionally, we will not be going over keybindings in this guide, but that will also come down to personal preference and comfortability. While we will touch on hotbars and their placements, how you decide to map out your skills is entirely up to you and the Job you're playing.
Useful Information

When adjusting your HUD, you will want to setback roughly an hour to an hour and a half of time as it will take quite some time for you to get everything where you want it. There are many ways for you to change up the layout of your HUD, and you may want to experiment with a few things as a result. For example, you can change the size and shape of every Hotbar and place miscellaneous skills and commands off to the side in a small box to avoid being overwhelmed by everything on the screen.
One important thing of note is the ability to resize pretty much everything on your HUD, allowing you to shrink down some of the "nonessential" items to make your screen feel and look less cluttered. We recommend taking the following menus, shrinking them down to ~60%, and keeping them out of the way:
- Duty List
- Minimap
- Scenario Guide
- Server Info
- Gil
- Inventory
- Main Menu
- Notices
These menus are primarily placed on the screen's outer edges, with the vast majority of them being near the corners. We recommend placing them with the same philosophy in mind to avoid unnecessary clutter or obstructing important information. Use the image above to get a rough estimate of where they should be, and rearrange them to what makes you feel the most comfortable.
Target Information

One of the most critical pieces of information presented on your HUD will be the "Target Bar," which will display things such as the HP, Progress Bar, and Status of your current target. However, you can - and should - make this menu better by doing the following: System > HUD Layout > Target Bar > Check the "Display Target Info Separately" box. This will separate each of the stats mentioned earlier into separate bars, allowing you to move them wherever you please on the screen.
The general rule of thumb is to have Target HP, Target Progress Bar, and Target Status all near the middle of the screen and your character. This will give you quick access to information such as current debuffs placed on the target, what it is about to cast, and how much health it currently has left. While it is up to you where you place them, we recommend you have them in an area your eyes won't have to travel too much to see. The information presented in each bar is critical and can make the difference between life and death. Refer to the image above for the "recommended" HUD layout for Target information. Remember, you should place them where you feel most comfortable with, but with the same goal in mind, having valuable information readily available to you at a glance.
Main Hotbars

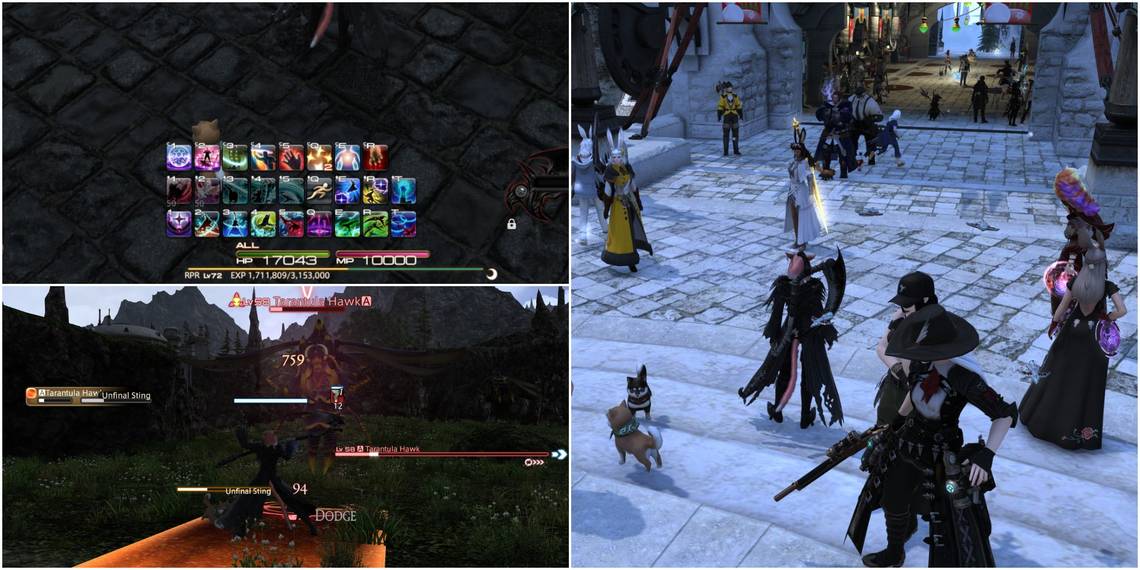
While it won't apply to everyone, we strongly urge you to change out of the default Hotbar setup if you want to clean up some of the space and clutter. When it comes to your main Hotbars, the ones you bind your skills to for combat encounters, you will want to keep those towards the bottom-middle of the screen but shrink them down a bit to free up some space. You can achieve this by dropping them down to 60% or 80% size and changing their grid layout. (System > HUD Layout > Hotbars 1-3 > 100% to 60% > Choose preferred grid layout)
You can stack three 12x1 Hotbars on top of one another like the image above, three 6x2 Hotbars next to each other, a variation of the two, or something completely different. However, if you are relatively new to the game or genre, we recommend keeping it simple until you get the hang of your keybinds and the overall layout of the HUD. For everyone else, we recommend keeping it towards the bottom-middle and out of the road to avoid it clashing with other essential windows of information. If you are not max-level with your current Job - like the Reaper pictured above - be sure to leave some spots open for future abilities down the road! Furthermore, you will want to save space around your main Hotbars for your Job Gauges to keep track of them much more quickly.
Additional Tips

With the main, more important stuff out of the way, you may want to clean up some of the other clutter on the screen regarding unused Hotbar slots, nametags, and more. Adjusting these settings is relatively simple and something we'd consider doing if you want a more "clean" look to your game.
To remove nametags follow these steps: System > Character Configuration > Display Name Settings. Once you are in this menu, you will see four tabs labeled Own, Others, NPCs, and General. We recommend going through each tab and changing every "Display Name Settings" option to "When Targeted" to get rid of every nametag on the screen unless you specifically target someone. As always, you can tweak these settings to your heart's content and make it so only your friend's nametag show, or NPCs only, etc. This recommendation is for those who want that clean look when roaming around.
Finally, let's go over how to remove those pesky empty Hotbar slots that can be an eyesore when there are too many. To do this, do the following steps: System > Character Configuration > Hotbar Settings. Once you are on this page, you will be on the "Display" tab of the Hotbar Settings menu. Stay on this page, look for the checkboxes underneath "Hotbar Display Settings," and look for the "Hide unassigned slots" option. Check that box to make the empty boxes vanish. Those slots remain there but will not display anything until you assign a command to it, which will do wonders for eliminating unnecessary clutter.


