Quick Links
Final Fantasy 14 has dozens of optional dungeons that can be explored outside of the main scenario. One of these dungeons is the Sunken Temple of Qarn, a temple used by an ancient civilization to worship a goddess of the sun. Filled with traps and puzzles, this dungeon doesn't make it easy to loot its treasures.
The Sunken Temple of Qarn is an optional dungeon, unlocked by a side quest at level 35. It is not necessary to complete this dungeon to continue with the Main Scenario Quests, but it does provide an optional challenge that will reward you for your time. Qarn will also teach you valuable mechanics that will be important to know later in your journey. Let's go over a full breakdown of this dungeon, including each boss and how to beat them.
How To Unlock The Sunken Temple Of Qarn

To unlock this dungeon, you will need to complete the following quest. There are no pre-requisites for this quest, other than being level 35 or higher.
Complete the quest 'Braving New Depths'
- NPC Location: Nedrick Ironheart - Vesper Bay, Western Thanalan (x:12.0, y:14.3)
Follow this quest until you speak with Bibimu at the entrance to the Sunken Temple of Qarn. After doing so, the dungeon will be unlocked.
The Sunken Temple Of Qarn Walkthrough

As you begin the dungeon, you may notice a set of scales in the first clearing. You will need to remember the position of these symbols for a puzzle later in the dungeon. For reference, the order is listed below.
| Left Side | Right Side |
|---|---|
| The Flame of Magic | The Fruit of Knowledge |
Clear the Oratory of Tatemefu II
Your first objective of the Sunken Temple of Qarn is to clear the Oratory of Tatemuefu II. This will be completed once you make it through the first section of the dungeon and defeat the first boss.
The most important thing to remember when going through this dungeon is to target the Temple Bees first. This enemy will perform the attack Final Sting if they are alive for long enough. Final Sting will deal damage equal to 90 percent of the target's maximum health. Kill the Temple Bees quickly to avoid nearly certain death from this attack.
As you move through the dungeon, you will come across relics that you are able to pick up. There are four relics to be found that can be used to open optional side rooms. As mentioned above, the Flame of Magic and Fruit of Knowledge are necessary to open the final door, while the other two relics, the Helm of Might and Gem of Affluence, are only used for opening the side rooms. We recommend picking them all up as you come across them, as this will allow you to open all four optional doors and ensure you receive the highest amount of treasure.
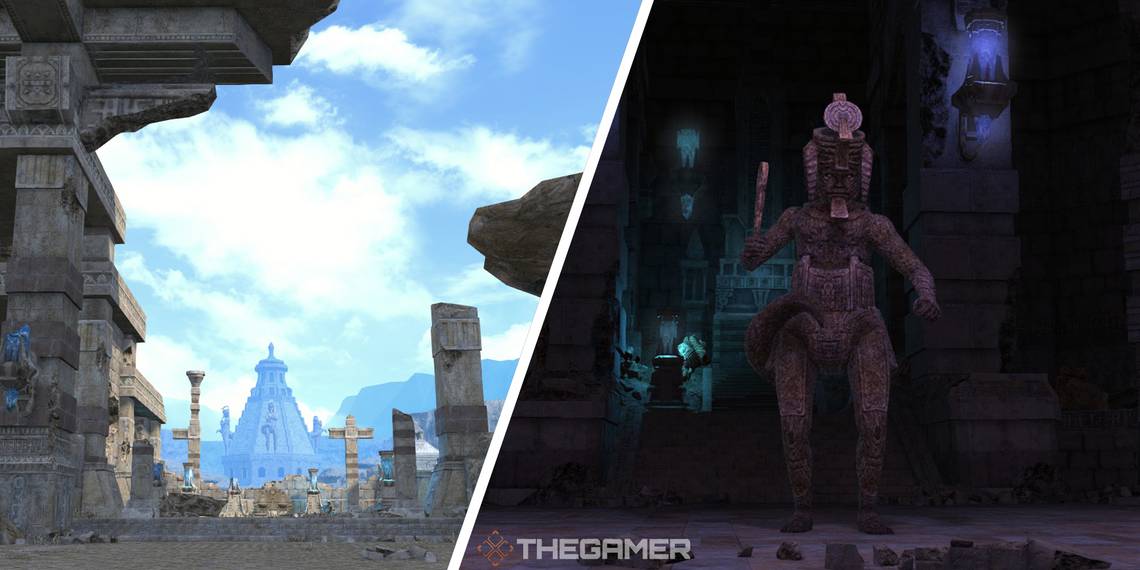
Defeat Teratotaur

Teratotaur is the first boss of The Sunken Temple of Qarn, and will have you dealing with a few challenging mechanics.
- Mow: Teratotaur will deal damage in a frontal cone AoE. Avoid this attack by stepping outside of the telegraph.
- Frightful Roar: Teratotaur will deal damage in a circle surrounding himself. Avoid by moving away from the boss when he begins casting this attack.
- Dung Wespe: Periodically, Teratotaur will summon Dung Wespes. These enemies are similar to the Temple Bees you have fought before, and will similarly use Final Sting after a short amount of time. Kill these enemies as soon as they appear to avoid being hit by Final Sting.
- Mortal Ray: Teratotaur will first 'begin to growl' before using Mortal Ray. This attack will inflict all party members will the Doom debuff, which will instantly kill its target after the duration ends. To cleanse yourself of Doom, you must step on one of the three glowing panels that are located around the room. The glowing panel will periodically shift between the three, so ensure you are standing on the glowing one to avoid Doom. From when Teratotaur uses Mortal Ray, you will have 12 seconds before Doom kills you, so act quickly.
Clear the Rosarium of Lalafuto I
After defeating Taratotaur, you will be able to continue through the dungeon.
Now you will be introduced to one of the special mechanics of this dungeon, the Qarn Facers. These giant heads need to be defeated on top of the glowing panel to open the corresponding door. When the Facer moves on top of the glowing panel, the light will turn off, indicating that the panel is activated. Kill the head and the door will open.
If the Qarn Facer is not defeated while on top of the panel, it will continue to respawn until you do so.
Clear the Adytum of Lalafuto IV
After making it through the first door, you will now be presented with two Qarn Facers and two glowing panels. Like before, you will need to defeat the Facers on the panels to open the doors.
After you have opened the doors, you will be able to collect the Flame of Magic and the Fruit of Knowledge relics from inside each room.
Collect the relics and make your way to the second boss, the Temple Guardian.
Defeat The Temple Guardian

The Temple Guardian is the second boss of the dungeon and boasts considerable defenses while its Golem Soulstone remains unbroken. The Golem Soulstone is essentially the boss' second life bar. While it is alive, the actual Temple Guardian will take almost no damage.
To defeat this boss, first, focus your attacks on the Soulstone to destroy it. Doing so will stun the boss, making it immobile for a duration while also increasing the amount of damage it takes. Use this opportunity to attack the Temple Guardian before the Soulstone is revived, then repeat this process until the boss is defeated.
- Boulder Clap: The Temple Guardian will attack in a cone-shaped AoE attack to its front. Move outside of the telegraphed area to avoid taking massive damage from this attack.
- Rockslide: The Temple Guardian will perform a telegraphed attack in a straight line to its front. Move to either side of the telegraphed AoE marker to avoid this attack.
- Stone Skull: The Temple Guardian will target a random player and deal damage to them while stunning them for a short duration. This attack is unavoidable, so make sure your healer is prepared to recover the party's health.
Tip the Scales of Judgment
After defeating the Temple Guardian, you will move into an area with four doors. These doors can only be opened by placing the necessary relic in the pedestal before each one. For example, the pedestal with the helmet insignia must have the Helm of Might placed inside to open its door. Inside each door is a special treasure coffer that will grant bonus rewards.
If you collected all four relics leading up to this point, claim your free treasure before moving on to the next part.
Behind the door in the center are the Scales of Judgment. Like before, the door to this area needs to be opened by a Qarn Facer. After doing so, you will find the Scales of Judgment. This object mirrors the one found at the beginning of the dungeon and requires you to place two relics in the correct order to open the door to the final boss.
Place the Flame of Magic on the left side, and the Fruit of Knowledge on the right side. Then interact with the Scales of Judgement and the door to the final boss will open, as well as doors to side rooms containing additional treasure coffers.
If you place the wrong relics or place them in the wrong order, additional enemies will spawn and the door will remain closed.
Proceed through the door to face the final boss, the Adjudicator.
Defeat The Adjudicator

This boss will make use of Qarn Facers and panels, as well as a new type of enemy called the Mythril Verge. Below we'll detail each of its attacks and how to avoid them.
- Darkness: Adjudicator will deal damage in a frontal cone AoE. Move outside the telegraphed area to avoid this attack.
- Paralyze: Adjudicator will inflict Paralysis on a random party member. This attack can be interrupted if the boss is stunned while casting. Otherwise, have the healer use Esuna to remove the debuff or wait for it to expire.
- Creeping Darkness: Adjudicator will deal a moderate amount of damage to all party members. Use AoE heals to recover from this attack.
- Adds: Throughout the fight, Adjudicator will summon two different types of adds. These come in the form of Sun Jurors and Mythril Verges.
- Sun Juror: These enemies are nearly identical to the Qarn Facers you've fought before. Similarly, they will need to be killed on the glowing platforms that are situated around the arena. If they are not killed on a platform, they will continue to respawn until you do so. However, they will stop spawning once Adjudicator starts summoning Mythril Verges.
- Mythril Verge: These enemies are stationary turrets that will fire a blue laser across the arena. Their attacks do a sizable amount of damage, but they have a relatively low amount of health. DPS Jobs should focus on killing these to avoid the party becoming overwhelmed by attacks.
- Eventually, Adjudicator will summon two squares around two different Mythril Verges. The Verge inside of this square will periodically use Verge Pulse, dealing damage to all party members. To avoid this, one player must enter the square, where they will be trapped inside until the contending Mythril Verge is defeated. Face the Mythril Verge one-on-one to break free from the square and end the Verge Pulse.
Notable Loot
Throughout The Sunken Temple of Qarn, you will come across a variety of different Treasure Coffers that contain valuable items. Below is a list of notable gear and items you can find in this dungeon.
- iLvl. 37 Sunken Temple of Qarn Weapons
- iLvl. 37 Sunken Temple of Qarn Armor
- Belah'dian Glass
- Elemental Shards


